Firmware version SC04 inside StimTracker units that were shipped before December 2010 contains a bug that prevents it from working well with E-Prime and Presentation. This document describes how to update the firmware to version SC05.
Please keep in mind that you are welcome to ship your StimTracker unit back to us and let us handle the firmware updating. Just let us know.
Updating the firmware requires a Windows-based computer. When StimTracker’s USB driver is installed, it presents itself to Windows as a serial port, also known as a COM port. Updating the firmware consists of the following three steps:
1. Identifying the COM port number that the USB driver presents itself as,
2. Slowing StimTracker’s baud rate (serial port speed),
3. Putting StimTracker in a “flash” programming mode, and
4. Re-programming the firmware’s flash memory
For steps 1, 2, and 3, we will use SuperLab for Windows. If you don’t have SuperLab, you can still download the demo and install it in order to complete these steps.
For step 4, we need a program called “PIC Downloader” and the updated firmware file.
One could also use Windows’ Device Manager to determine the COM port number. But we will use SuperLab since we will be using it to complete steps 2 and 3 as well.
We are going to try and send a command to StimTracker on every COM port and see which one will cause StimTracker to respond. This task is rendered considerably easier by the fact that SuperLab will only show you the COM ports that are available. To proceed:
A.
Run SuperLab
B.
In the main window, notice how the list of blocks has a blue outline around it. Press Tab twice to move the blue outline to the list of events.
C.
Click on the Edit menu and then on One New Event. The Event Editor dialog (window) appears.
D.
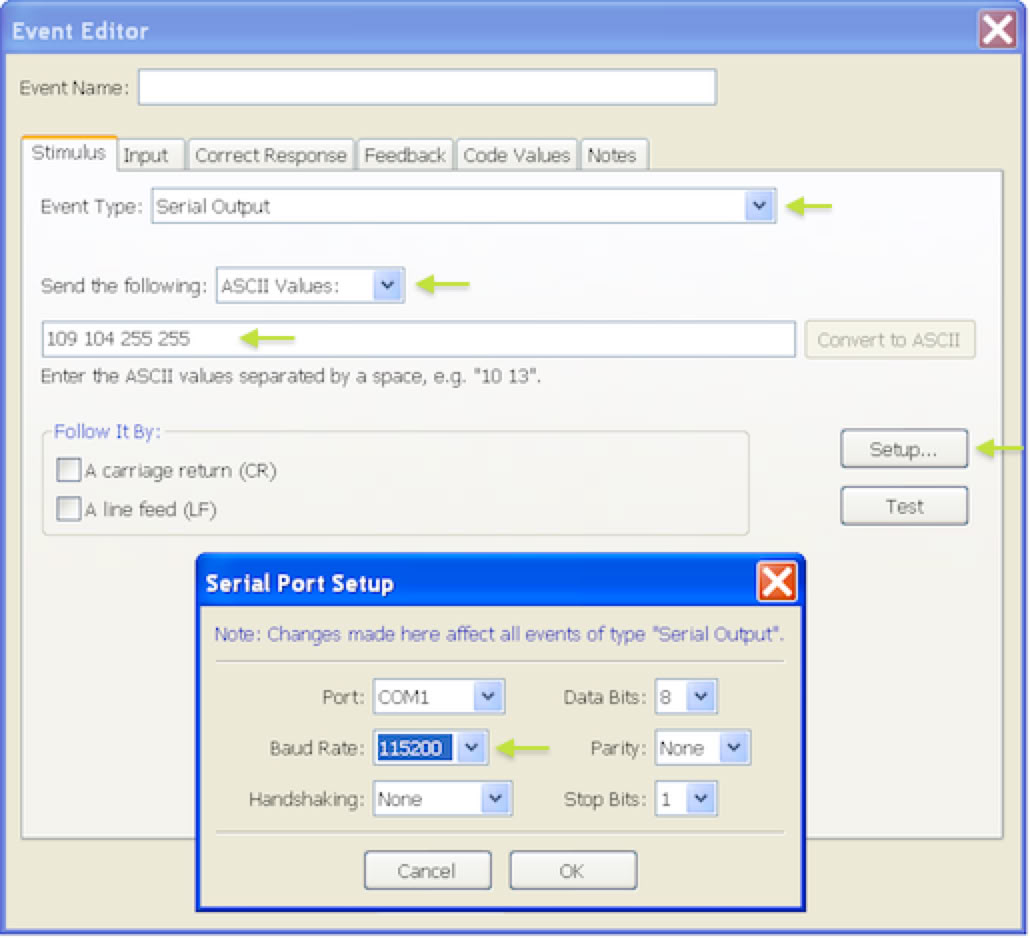
In the Event Editor’s Stimulus tab, click on the “Event Type:” drop down menu and change the event type to “Serial Output”.
E.
Click on the “Send the following” drop down menu and select ASCII Values.
F.
In the edit field below it, type “109 104 255 255″.
G.
Click on the Setup… button. Another smaller dialog appears.
H.
Click on the Baud Rate drop down menu and select 115200:
I.
Note the selected Port. In the screen snapshot above, it is COM1 but this will likely be different on your computer.
J.
Click on OK.
K.
Back in the Event Editor window, click on the Test button. On StimTracker, the blue “Marker” light should turn briefly on and off. Try a couple of times. If you see the blue light turn on, skip the rest of these steps, but do not close the Event Editor or SuperLab.
L.
If you do not see the blue “Marker” light blink, then click on the Setup button again.
M.
Click on the Port drop down menu and select the next available COM port.
N.
Click on OK.
O.
Repeat step K.
If you cannot find a valid serial port (by seeing StimTracker’s blue “Marker” light turn on), then it’s possible that StimTracker’s USB driver is not installed correctly. You can always contact us for support.
Important: if the COM port number is 7 or higher, then you need to follow the instructions on this page to rename the COM port, or email us for support. The reason is that the PIC Downloader program can handle COM1 through COM6 only.
The PIC Downloader program does not work at the default 115200 baud rate that StimTracker uses. We need to change it to 9600 baud. The following steps assume that the Event Editor is still open:
A.
In the Stimulus tab, replace the text that you typed earlier (“109 104 255 255″) with “102 49 0″.
B.
Click on Test button.
This should set StimTracker to 9600 baud.
A.
Click on the Setup button again.
B.
Change the Baud Rate setting to 9600.
C.
Click on OK.
D.
Back in the Event Editor’s Stimulus tab, replace the text that you typed earlier (“102 49 0″) with “102 051″.
E.
Click on Test button.
The blue Marker light will turn on and stay on.
The last step is to download the PIC Downloader program and run it:
A.
Download this zipped file. It contains both the PIC Downloader program and firmware version SC05.
B.
Unzip / extract the contents of the ZIP file. The way this is done changes from one version of Windows to the other, but it can usually be done by right-clicking on the “pic_downloader.zip” to bring up a menu.
C.
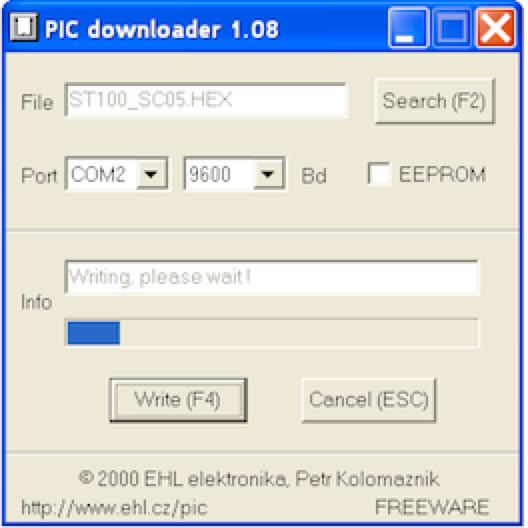
Once the two files are extracted from the ZIP file, double-click on “PIC_downloader.exe” to run it.
D.
Click on the Search (F2) button. The Open dialog appears.
E.
There should be only one file showing named “ST100_SC05.HEX”. Double-click on it to select it.
F.
Select the Port as was determined in Step 1 above.
G.
Set the baud rate (denoted as “bd” in the program to 9600.
H.
Click on the Write (F4) button to get the programming started:
I.
When the programming is done, PIC Downloader will display a gray message “All OK!”.
J.
Last thing: turn StimTracker off and back on.
You’re done. After the firmware update, StimTracker’s default baud rate is automatically restored to 115200.
Last revision: December 6, 2010
PRODUCTS
SUPPORT
STAY IN TOUCH
© Copyright 2026 Cedrus Corporation, P.O. Box 6309, San Pedro, CA 90734 - USA
Phone: +1-310-548-9595. Send us an email
qwerasdf