In this tutorial, we build a word/non-word experiment that will present instructions to the participant followed by six trials. Each trial will consist of a cue and stimulus.
When developing your own experiments, plan carefully and take advantage of the stimulus lists feature. This can save you time, will make it easier to see the structure of your experiment and maintain it, and will make analyzing the data easier later on.
This is worth emphasizing: you should use stimulus lists whenever possible. Not only it will save you time, you can add new items to a list without affecting the experimental design. You also get more options, e.g. two-level randomization.
Assuming you have read Getting Started with SuperLab, let’s start.
In this experiment, the participant is expected to press the letter “y” (for yes) if it’s a word or “n” if it is not a word. Let’s start by defining these two keys as responses:
You have created the first response.
[INSERT SCREENSHOT HERE]
Now create the second one by clicking on the + icon again, rename the new response to “No”, and set the key to “n”.
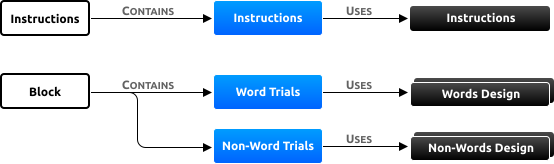
This diagram illustrates the structure of the experiment we want to build:
Notice how “Word Trial Design” and “Non-Word Trial Design” are represented using stacked rectangles. This indicates that the design uses at least one stimulus list, resulting in multiple presentations; more below.
When you open a new experiment, SuperLab creates two trial designs: “Instructions” and “My Design”:
1. In the sidebar, click on Trial Designs.
2. Double-click on “My Design” to edit it.
3. Type “Words Design” then press Enter.
4. Click on the Edit Design button; you can also double-click on the design thumbnail.
This will launch the trial designer. The default design that SuperLab had created contains two slides named “Cue” and “Stimulus”.
[INSERT SCREENSHOT HERE of the trial design, perhaps upper part only]
1. The Cue slide is set to appear for 500 milliseconds; you can change that in the inspector (in the Slide tab).
2. Click on the “Stimulus” slide to select it.
3. In the black bar, click on the “open toolbox”
4. Click on the icon for Text. SuperLab will display a dialog so you can provide the text.
This dialog has two tabs. In the This Text tab, you canprovide instructions or any other text that does not require a list. But for our purpose:
[INSERT SCREENSHOT HERE of the text editing dialog]
Feel free to adjust the font size or other text properties. Note that we have just added text to the slide and created a stimulus list on the fly.
Creating stimulus lists on the fly is a great time-saving feature. It’s not just for text: you can create lists on the fly for pictures, audio, and movies as well.
We need to do one more thing with this design: to tell SuperLab what is the correct response:
<<<<< insert screenshot of dialog >>>>>
Click on the Close Trial Designer button.
We are now back in the main window. Let’s create the trial design for non-words:
We have completed the needed trial designs for a word / non-word paradigm.
SuperLab automatically creates a block, a trial, and a trial design for participant instructions. All we need to do is edit it:
If you were a participant in this experiment, you will not see a difference whether the correct response is set or not. But this is an important step to complete:
Let’s proceed:
[INSERT SCREENSHOT HERE]
Now let’s do the same for the “Non-Words” list.
In summary: the correct response is to press “y” when the participant sees a word or “n” when it’s a non-word.
In the Responses tab, notice the checkbox Correct response is the same for all items in the list. Use this option whenever possible. This way, you can add list items without having to remember to set the correct response every time.
We are almost done.
In sidebar, click on Experiment.
The trials are now all setup. We’re almost there.
Lastly, we need to have the block include both trials.
“Block 1” now includes both word and non-word trials. There is one last step but an important one:
Congratulations! The experiment is now complete.
Click on the Ready to Run… button. SuperLab will present some options:
<<<<< insert screenshot, perhaps of the top half only >>>>>
For now, we suggest you enable the option Run in Pilot mode. SuperLab saves all the collected data in a folder. This folder contains a subfolder named “Pilot”. When you run an experiment in pilot mode, the data is saved in the “Pilot” subfolder. This helps you separate data that you yourself collect to verify that the experiment is working well from the actual data that is collected from participants.
Do not worry if you make a mistake with pilot mode; you can always move a data file out of the “Pilot” subfolder. See Data Files for a description of how data is stored.
And last but not least, click on the Run button. SuperLab will open a window that covers the entire screen. Act as a participant and press the Y or N keys until the experiment is complete.
When done, click on the Data tab to see the result of your run:
<<<<< insert screenshot of data viewer >>>>>
Not the checkbox Show pilot data. This is how can view pilot data versus participant data.
Back in the main SuperLab Documentation page, you will find a number of other documents that describe specific features.
PRODUCTS
SUPPORT
STAY IN TOUCH


© Copyright 2026 Cedrus Corporation, P.O. Box 6309, San Pedro, CA 90734 - USA
Phone: +1-310-548-9595. Send us an email
qwerasdf