The microcontroller inside c-pod contains firmware (embedded software) that is occasionally updated to add new features or fix bugs.
Version
Changes and Additions
Release Date
2.1.0
Initial firmware when c-pod first shipped
Aug 2017
2.1.2
Stability improvements, adds minor new features
Dec 21, 2017
2.1.3
Fixes a minor edge case issue
Jan 17, 2018
2.2.1
Minor bugs fixed
Nov 10, 2018
2.2.2
Adds memory integrity features and the ‘au’ command
Mar 8, 2019
2.2.3
Added ‘_mt’ to return the pulse table
May 1, 2020
2.2.5
Added the ‘mx’ command
Feb 23, 2021
2.2.7
Added the Set Output Logic ‘al’ command
Apr 11, 2022
2.2.8
Added support for new Analog c-pod
Dec 15, 2022
2.3.0
Updated support for revised Analog c-pod hardware
Dec 11, 2023
2.3.5
Added new commands for timing calibration
Jul 2, 2025
Updating the firmware consists of three main steps:
The update can be performed on a Windows computer only. Two files will need to be downloaded. We recommend that you save both of them on the desktop to make them easier to find later on.
The first file is the firmware itself:
This is a compressed file in the .HEX format. Some browsers will automatically convert it to a .HEX file, others won’t. To be sure, find your “Downloads” folder. If you see a file named “pod_231109_402N1_BL_v2.3.0.zip”, then right-click on it. From the menu that appears, choose Extract All….
Download c-pod firmware (23KB)
Next, you need to download Xidon 2 (pronounced Zydon) if you don’t have it already.

These steps assume that the USB driver is installed.
1.
Connect c-pod to the computer via USB cable. The link LED (🁢) should turn on and stay on.
2.
In the Xidon 2 folder, double-click on the “Xidon” application to run it.
3.
In Xidon, click on the Search for Device button; Xidon will detect c-pod if the USB driver is installed.
4.
From the Device menu, choose Update c-pod Firmware. Xidon will:
5.
6.
7.
8.
9.
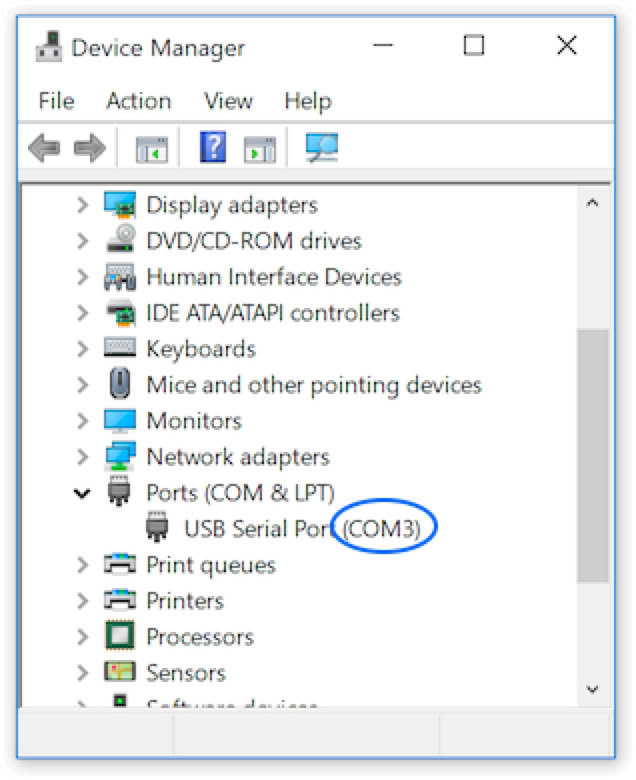
Use the Windows’ Device Manager to determine which COM port the device is connected to. You can run the Device Manager by clicking on the Start icon in Windows and typing “device manager” in the search box.
Once opened, expand the section “Ports (COM & LPT)”. The device will be listed in that section, named “USB Serial Port” and followed by the COM port number.
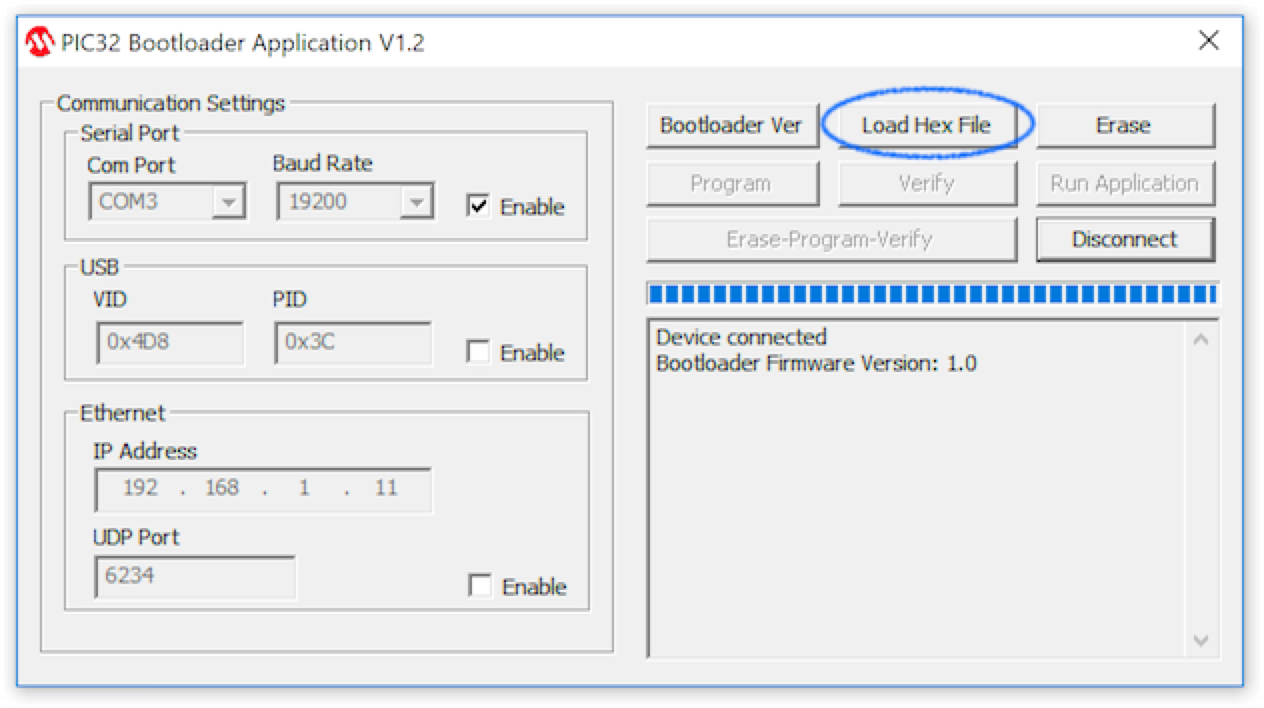
Back in the PIC32 Bootloader application, click on the “Com Port” menu and select the COM port, COM3 in this example.
Click on the “Baud Rate” menu and select “19200”.
Click on the Connect button; you will see a “Device connected” message.
Click on the Load Hex File button. When the application prompts you to locate the file, select the file that was downloaded earlier.
10.
Click on the Erase-Program-Verify button. This will start the firmware updating process and takes about a minute. The updating is complete with the application displays “Verification successful”.
Note: On occasion, the PIC32 Bootloader application will show a message indicating that the process failed. This is usually not true. If you get this message and c-pod fails to run afterwards, please contact Cedrus.
11.
At this point, c-pod needs to be restarted; unplug the USB cable and re-plug it.
When shipped, c-pod contains an internal product model number that allows software such as SuperLab to determine the exact model, e.g. “c-pod for Parallel Port” or “c-pod for Tobii”. When the firmware is updated, this internal model gets erased and needs to be set again. It’s quick:
12.
Double-click on the “Xidon” application to run it.
13.
In Xidon, click on the Search for Device button; Xidon will detect your device.
14.
From the Device menu, choose Set c-pod Model; a dialog will open.
15.
In the dialog, select the correct c-pod model and click on the OK button.
Your c-pod is now ready to use.
Last revision: Jul 10, 2025
PRODUCTS
SUPPORT
STAY IN TOUCH
© Copyright 2026 Cedrus Corporation, P.O. Box 6309, San Pedro, CA 90734 - USA
Phone: +1-310-548-9595. Send us an email
qwerasdf